20 KiB
Reverse engineering the protocol of my thermal printer
I received the Vyzio B15 as a gift around a year ago and from the beginning I knew that I wanted to figure out how to print from my computer, as the required app (TinyPrint) seemed weird.
Recently I came across WerWolv's blogpost about reverse engineering his thermal printer's protocol and I was inspired to try with my own. Furthermore, I decided on attempting this with as little looking at their article rias possible.
1. Sniffing BLE traffic with ESP32
At first I attempted to just look at the data directly. Using the nRF Connect
app on my phone I read what BLE services and what characteristics with which
properties the printer supports. I also saw its name - "X6", which I assumed to
be the internal model name. With this information I programmed my ESP32 C6 to
have the same name and characteristics.
I successfully managed to convince the app that my esp32 is the printer and I printed an image to observe the traffic. I made the following observations:
- Only one characteristic is used for communication from the app to the
printer. (uuid
0xAE01) and it has the propertyWRITE_NO_RESPONSE. Also, the responses are send back on0xAE02, which has the propertyNOTIFY. - The data is definitely sent in packets, beginning with
0x51 78and ending in0xFF.
2. Generating test images and looking at the BLE data
I wrote a python script to generate small test images: testGen.py. I took those images and recorded their corresponding BLE traffic into text files. Then, after using this vim macro to format them a bit better:
ggVGgJ:%s/5178/^V^M5178/g^MggddG:s/0*$/^M:%s/\(\w\w\)\(\w\w\)/\1 \2/g^M:%&g^M
, I began just staring into the captures.
After not seeing anything I recognised, I decided that each pixel was a byte in the capture, since I had not noticed that my printer can't print grayscale and uses dithered black and white to print. This turned out to cost me a lot of time. I wrote two scripts to visualise the data (img_v1.py and img_v2.py), but since I expected whole bytes to correspond to pixels, I visualised each byte's value from 0x00 to 0xFF as brightness.
If I had noticed that my printer prints only black and white dots, I 100% would have tried visuallising individual bits and I would have discovered the main protocol without even having to look at the app. But that way I wouldn't've had such a complete understanding of the protocol.
I also wrote a script (dataToBin.py) that reads the capture files into binary ones, so I could look at them in a hex editor. I didn't find anything that way either. The funny thing is that I only later realised that the hex editor I used - ImHex, is also made by werwolv, the originial author of the cat printer article.
3. Beginnings of reverse engineering the app
I gave up on looking at the captures alone and decided that I needed to take a
look at the app that I used. It is called TinyPrint and I only later found out
that it is by the same publisher as werwolv's iPrint, and their internal code
is nearly identical.
I got the application's .apk, used an online java decompiler and dove straight
into the source code. I knew that the "Print" button is on the screen where you
can preview your print and adjust settings, so I started looking for files that
contain "Preview". I found one that looked promising and began reading
com/activity/PrintPreviewActivity.java.
After skimming through the file and layout xml files, I found the printBtn()
function, which I assume is called when the button is pressed. From reading it I
got to the printData() function, which caused a
this.mMyHandler.sendEmptyMessage(5).
After reading a bit on the architecture of an android app, I found the handler
function handleMessage and ... it was not decompiled correctly. I tried a
bunch of different decompiler sites, but in the end I decided to dive into the
java pseudo-bytecode and hope it leads to another function call. The case 5:
eventually lead to calling the function printBitmap, which sent another empty
message - 4. In the end case 4: in the handler lead to a call to
com.lib.blueUtils.PrintDataUtils.BitmapToData() function.
4. Distraction leading to progress for later
For some reason before continuing to the BitmapToData function, I decided to
focus on finding out which activityType the PrintPreviewActivity class had, and
this lead to nothing, just half a day of my live wasted.
While I was searching for that, I discovered the class com.Utils.PrinterModel
and the util class for creating the PrinterModels -
com.Utils.PrintModelUtils. The former held every possible attribute for a
printer and the latter creates a PrinterModel instance presumably for every
model, supported by the app.
In PrinterModel there was a big function that just assigns certain fields to
its arguments, and it was called in PrintModelUtils for each model. The
function looks like this:
public DataBean(String str, int i, int i2, int i3, int i4, int i5, String str2,boolean z, int i6, int i7, int i8, int i9, boolean z2, int i10, int i11, int i12, int i13, int i14, int i15, boolean z3, boolean z4, boolean z5, booleanz6, String str3, int i16, int i17) {
    this.grayPrint = false;
    this.grayThinEneragy = 0;
    this.grayModerationEneragy = 0;
    this.grayDeepenEneragy = 0;
    this.slowInterval = 0;
    this.grayImageSpeed = 40;
    this.grayScale = 1.0d;
    this.showElectricityModel = 0;
    this.addMorPix = true;
    this.A4XII = false;
    this.tattooPaper = false;
    this.tattooSpeed = 0;
    this.tattooEnergy = 0;
    this.addMorePixNum = -1;
    this.d1key = "";
    this.useNewActivation = false;
    this.lzoVersion = "";
    this.labelDevice = false;
    this.labelDeviceSize = 0.0f;
    this.autoLabelCheck = false;
    this.corePrint = false;
    this.modelNo = str;
    this.model = i;
    this.size = i2;
    this.paperSize = i3;
    this.printSize = i4;
    this.oneLength = i5;
    this.headName = str2;
    this.canChangeMTU = z;
    this.devdpi = i6;
    this.imgPrintSpeed = i7;
    this.textPrintSpeed = i8;
    this.imgMTU = i9;
    this.newCompress = z2;
    this.paperNum = i10;
    this.interval = i11;
    this.thinEneragy = i12;
    this.moderationEneragy = i13;
    this.deepenEneragy = i14;
    this.textEneragy = i15;
    this.hasId = z3;
    this.useSPP = z4;
    this.newFormat = z5;
    this.canPrintLabel = z6;
    this.labelValue = str3;
    this.backPaperNum = i16;
    this.detectionValue = i17;
}
I noticed that in PrintModelUtils there were two printers with the name "X6" -
one was x6 and one was x6_n. I mentally noted that fact and coppied the x6
function call above the DataBean function in a seperate file. Then I created
this legendary vim macro:
0f(l"ddt,xxj0f(ldw"edt,xxjvi{:s/^Re;/^Rd; \/\/ FROM FUNCTION^M?{k0
It takes each argument and replaces it, so I had a file with all the model's characteristics. (See x6_n.java)
5. Finally in the right direction
I began reading the function BitmapToData() in
com.lib.blueUtils.PrintDataUtils. In there I discovered the command for
getting the printer's status (0x51 78 A3 00 01 00 00 00 FF). The function did
other things, but it lead me to eachLinePixToCmdB(). That method also wasn't
decompiled, but I assumed the grayscale variant eachLinePixToCmdGray(), which
was, would be similar, so I started reading that. After a little reading I
realised that their logic was definitely not the same so for the second time I
started reading java pseudo-bytecode line-by-line with a second vim window open
for notes about what each "variable" (register) contained at any given moment.
When in the first few lines of the function I saw the line width getting divided
by 8, I knew I was in the right place.
6. Discovering packets (commands)
I slowly discovered several packet types:
- enerAgy: 0x
51 78 AF 00 02 00 <energy_low> <energy_high> <crc> FF - printType: 0x
51 78 BE 00 01 00 <type> <crc> FF, where the types are:0x00for Image0x01for Text0x02for Tattoo (which I ignored since my printer doesn't support it)0x03for Label
- feedPaper:
0x51 78 BD 00 01 00 <amount> <crc> FF - paper:
0x51 78 A1 00 02 00 <amount_low> <amount-high> <crc> FF- this one actually feeds the paper
Back in BitmapToData() I discovered:
- blackening(quality):
0x51 78 A4 00 01 00 <quality> <crc> FF, which is always 3/5 for my printer(51, because they for some reason go from 49 to 51). Thus<quality> = 0x33and<crc> = 0x99
Again in eachLinePixToCmdB() I used a couple of vim substiture commands to try
making it easier to read. You can see them in
Appendix 1
7. Simple algorithm, difficult to read
In reading the function I discovered calls to a misterious method called
DataTrim(). I saw that it was called with a byte from the input and an int of
some kind. Only when I noticed that it crashes for values of the byte that are
not 0 or 1 I decided that with more context I will be able to understand it and
continued onwards.
After two entire times following the code flow through gotos and labels I
finally understood eachLinePixToCmdB(): It attempts two methods for
compressing the pixels of the line:
- Run-length encoding: Each byte's most significant bit encodes the run's value and the 7 remaining encode the number of consecutive occurences of the value.
- Bit packing: Each byte's 8 bits each encodes one pixel seperately.
In the end you get a properly-formatted command for drawing the line, depending
on which method is shorter:
0x51 78 <A2 | BF> 00 dataLen 00 <data> <crc> FF
With the commands being the following:
0xA2- bit packed pixels0xBF- run-length encoded pixels Note that dataLen practically never requires more than 8-bits, but if it does the 00 after it will contain the high byte.
With that I finally concluded this dreaded function.
8. How the app prints an image, step by step
- Blackening:
0x51 78 A4 00 01 00 33 99 FF- constant 51 (3/5) for my printer - EnerAgy:
0x51 78 AF 00 02 00 <energy_low> <energy_high> <crc> FF- energy, whatever that meant. This is sent only if the print type isn'tText. - PrintType:
0x51 78 BE 00 01 00 <00 | 01 | 03> <crc> FF- Image, Text or Label - FeedPaper(speed):
0x51 78 BD 00 01 00 <speed> <crc> FF- Speed is taken from the model's characteristics and depends on the print type. For my printer textSpeed is10and imageSpeed is30. - Each line with either
0xA2or0xBF. Note that which method is used is decided on a line-by-line basis. - FeedPaper(25):
0x51 78 BD 00 01 00 19 4F FF- the value is hardcoded - 2 x Paper(48):
0x51 78 A1 00 02 00 30 00 F9 FF- This, as opposed to FeedPaper, actually feeds the paper. For some reason it is called two times with 0x30, instead of one time with 0x60. Also, according to the code it this is only for printers that don't have the fieldisCanPrintLabelset. My one does, so I don't know why this one appears. - FeedPaper(25):
0x51 78 BD 00 01 00 19 4F FF- the value is hardcoded
9. Decoding images from data captures
I began writing a script to decode images on Termux on my phone. I finished it later at home and it worked! I could successfully recreate an image from captured data. That script is this, but I later adapted it to the architecture of the library, so it is more usable as a module here.
10. What's left now?
I was already pretty happy with what I had achieved, but I wanted to more:
- How is the energy value determined?
- How is the print type determined?
- How is the speed determined?
- Generate commands myself (image ->[generate]-> commands ->[decode]-> same image)
- Actually connect and send info
11. How the energy is determined
From the sniffed commands I knew that the energy of the printer when Print Depth
is set to 7 (the max) = 10875. In the code I discovered the following formula
for energy:
energy = (concentration - Code.DEFCONCENTRATION)*0.15*d + d
where Code.DEFCONCENTRATION = 4 and d = model.moderationEneragy. I assumed that
concentration is the print depth, since the Code.DEFCONCENTRATION = 4, which
is in the middle of 1 and 7, the bounds of the print depth. With this I had the
following equation: 10875 = (7 - 4)*0.15*d + d, which when solved results in
d=7500. But in the model's characteristics moderationEneragy = 8000.
This is when I remembered that little note about x6 and x6_n and yep...
x6_n's moderationEneragy = 7500. So from this moment on I knew that my printer
was in fact a x6_n and updated x6_n.java
accordingly.
In the end we have a final formula for the energy:
energy = (printDepth - 4)*0.15*7500 + 7500 =>
energy = (printDepth - 4)*1125 + 7500
12. Print type and speed?
When I print an image in the app, the print type is Image or Text (depending on selection), the speed varies accordingly (10 for text and 30 for Image), and energy is only attached when type isn't Text.
When printing a label, it behaves exactly like Image: speed=30, energy is sent,
just printType = 0x03.
When printing a document, the printType could be Image or Text depending on selection, but in both cases speed is set to 10 and energy is not sent.
13. Recreating the protocol in a script
After that I started trying to implement a script to generate commands for an image file. (I don't bother with resizing or dithering, I expect an image which is 384 pixels wide and has a bit depth of 1 bit per pixel (1bpp) ).
My first obstacle was the crc8 checksums, which I had ignored until that point.
I looked at the algorithm and the cheksum table in
com.lib.blueUtils.BluetoothOrder. The algorithm seemed pretty simple, but I
had one problem: One element was missing from my CHECKSUM_TABLE. The decompiler
had replaced some of the numbers with random constants from some of the
libraries in the apk, but fortunately it had included them and I could hunt down
the constants. I couldn't find only one value: Deleted59, as it had no class
or corresponding import:
private static final byte[] CHECKSUM_TABLE = {0, 7, 14, 9, 28, 27, 18, 21, 56,
63, 54, 49, 36, 35, 42, 45, 112, 119, 126, 121, 108, 107, 98, 101, 72, 79, 70,
65, 84, 83, 90, 93, -32, -25, -18, -23, -4, -5, -14, -11, -40, -33, -42, -47,
-60, -61, -54, -51, -112, -105, -98, -103, -116, -117, -126, -123, -88, -81,
-90, -95, -76, -77, -70, -67, -57, -64, -55, -50, -37, -36, -43, -46, -1, -8,
-15, -10, -29, -28, -19, -22, -73, -80, -71, -66, -85, -84, -91, -94, -113,
-120, -127, -122, -109, -108, -99, -102, 39, 32, 41, 46, 59, 60, 53, 50, 31, 24,
17, 22, 3, 4, 13, 10, 87, 80, 89, 94, 75, 76, 69, 66, 111, 104, 97, 102, 115,
116, 125, 122, -119, -114, -121, -128, -107, -110, -101, -100, -79, -74, -65,
-72, -83, -86, -93, -92, -7, -2, -9, -16, -27, -30, -21, -20, -63, -58, -49,
-56, -35, -38, -45, -44, 105, 110, 103, 96, 117, 114, 123, 124, 81, 86, 95, 88,
77, 74, 67, 68, 25, 30, 23, 16, 5, 2, 11, 12, 33, 38, 47, 40, Deleted59, 58, 51,
52, 78, 73, 64, 71, 82, 85, 92, 91, 118, 113, 120, 127, 106, 109, 100, 99, 62,
57, 48, 55, 34, 37, 44, 43, 6, 1, 8, 15, 26, 29, 20, 19, -82, -87, -96, -89,
-78, -75, -68, -69, -106, -111, -104, -97, -118, -115, -124, -125, -34, -39,
-48, -41, -62, -59, -52, -53, -26, -31, -24, -17, -6, -3, -12, -13};
Luckily, it was only one and since each value from 0 to 255 appeared
exactly once, it meant that if I xor-ed all of the other values together I
would arrive at the correct value. Later I compared the missing number with the
one in the corresponding position in werwolv's table and it matched.
Thank God for bitwise tricks!
After a little more coding I had written commands.py. Now I could successfully input an image, have it generate commands and then decode those commands back into the original image. Or the opposite, commands to image to commands.
14. Talking to the printer
After copy-pasting a bit of code from some tutorials and examples with the
library Bleak, I could send things to the printer. I decided on asking it for
its status beforehand (0x51 78 A3 00 01 00 00 00 FF). Until now I hadn't
looked into what the printer sends back, but after a little searching and code
following I got to BluetoothOrder.java's getDevState() function. The
response packet contains 3 bytes of data: the first one is the device status. I
am not sure on the second and third ones, but I think they are labelNum and
battery level, whatever that means.
The logic for determining the printer's status is the following, depending on the status byte:
equal to 0b00000000  -> OK
ends with 0b1        -> out of paper
ends with 0b10       -> compartment open
ends with 0b100      -> overheated
ends with 0b1000     -> low battery
ends with 0b10000    -> currently charging
ends with 0b10000000 -> currently printing
I decided that the only statuses I accept are OK, Low battery and Charging. Otherwise, I refuse to send the commands. After that I fumbled a bit with python's context manager api for my Connection class. In the end I implemented the correct methods and finished connection.py.
15. This was a fun project indeed
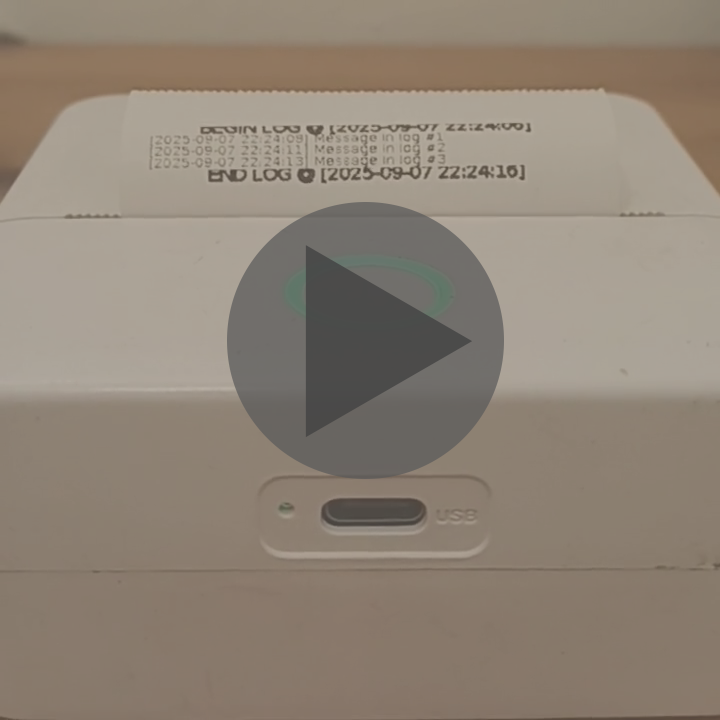
In the end I could print an image from my computer, or even print text line-by-line. The code for printing a log is left as an example in main.py.
Appendix 1: Vim commands for more readable java pseudo-bytecode
:%s/\(.* \)\?r\(\d\+\) = \(.*\);$\n\t\(.* \)r\2 = \(.*\);$/\=("\t".submatch(4)."r".submatch(2)." = ".substitute(submatch(5),"r".submatch(2),"(".submatch(3).")","")."; \/\/ rule 1")/gr1 = 2+3+r7; String r1 = someFunction(r1*2, "abc"); //---------------- String r1 = someFunction((2+3+r7)*2, "abc"); // rule 1:%s/\(.* \)\?r\(\d\+\) = \(.*\);$\n\tr\2 = \(.*\);$/\=("\t".submatch(1)."r".submatch(2)." = ".substitute(submatch(4),"r".submatch(2),"(".submatch(3).")","")."; \/\/ rule 2")/gr1 = 2+3+r7; r1 = r1*2; //---------------- r1 = (2+3+r7)*2; // rule 2:%s/int r\(\d\+\) = r\1 \([+-]\) \(.\+\);/r\1 \2= \3; \/\/ rule 3/gint r1 = r1 - 120*3; //---------------- r1 -= 120*3; // rule 3:v/r\(\d\+\) = \(\-\?\d\+\);\n.*r\1 \?=.*/ s/r\(\d\+\) = \(\-\?\d\+\);$\n\t\(.*[ (]\)r\1\(.*\)/r\1 = \2;^M\t\3\2\4 \/\/ rule 4/gr4 = -80; r5 = r4; //---------------- r4 = -80; r5 = -80; // rule 4:%s/boolean r\(\d\+\) = \(.*\);\n\tif (r\1\(.*\)$/if ((r\1 = \2\)\3 \/\/ rule 5/gboolean r17 = getABooleanFunction(r4, r28); if(r17 || r9) goto L_0x5555; //---------------- if((r17 = getABooleanFunction(r4, r28)) || r9) goto L_0x5555; // rule 5:%s/if (\(.*\)) goto \(L_0x....\);\n\tif (\(.*\)) goto \2;/if ((\1) || (\3)) goto \2; \/\/ rule 6/gif (r4) goto L_0x6666; if (r5) goto L_0x6666; //---------------- if((r4) || (r5)) goto L_0x6666;
Broken, but still cool:
:%s/if \(.*\) goto \(L_0x....\);$\n\(^\t.*$\n\)\+\tgoto \(L_0x....\);\n\2:$\n\(^\t.*$\n\)\+\4:/if \1 { \/\/ rule 7^M\5\t} else {^M\3\t}/gif (r4) goto L_0x1111; System.out.println("false"); goto L_0x2222; L_0x1111: System.out.println("true"); L_0x2222: //---------------- if (r4) { // rule 7 System.out.println("true"); } else { System.out.println("false"); }